现象
我的 PC 配置如下:
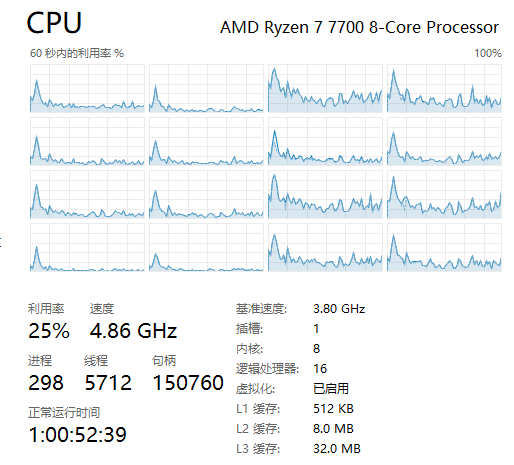
处理器 AMD Ryzen 7 7700 8-Core Processor 3.80 GHz
机带 RAM 32.0 GB (31.2 GB 可用)
版本 Windows 11 专业版
版本 23H2
安装日期 2022/5/7
操作系统版本 22631.3227
体验 Windows Feature Experience Pack 1000.22687.1000.0
由于经常会出现明明没有负载,CPU 却长时间保持满载(全核占用 100%)的情况,尤其是一段时间没有操作即将进入休眠的时候。
查阅了很多资料,整理一些解决方案供大家参考。
方法1:卸载 MSI 提供的相关软件
由于我的主板是 MSI 的 B650I EDGE,安装了 MSI Center 这款软件,根据网友提供的说法,如果出现这种占用异常的情况可以卸载掉试试看。

方法2:安装任意杀毒软件
根据这篇文章:Windows Defender can Significantly Impact Intel CPU Performance, We have the Fix 的说法,Windows 自带的杀毒软件 Windows Defender 在实时防护的状态下会占用过多 CPU,可以选择安装其它任意杀毒软件提供防护。
我这里安装的是小红伞 Avira,它提供免费的安全防护软件。
Avira Free Antivirus for Windows

方法3:补全闲时运行程序
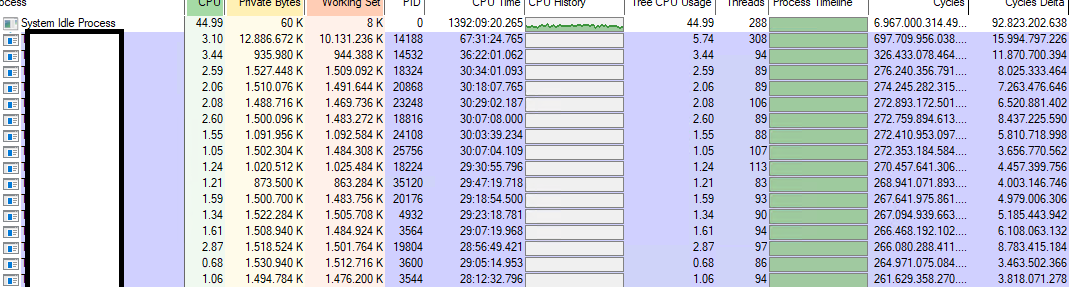
缺失闲时运行程序(System Idle Process)是我认为最有可能导致这个问题的原因。
根据这篇文章:
解决的方法是下载一个脚本,并在 Windows 安全模式下运行即可解决,不过我在管理员终端执行后也得到解决。
1) Download and extract the file "Restore_idle_disable” on a disk drive. (Here we extract the file on the system drive C: as an example.)
2) Boot the system into the WinRE command prompt. (click Windows key > Settings > Update & Security > Recovery > Advanced startup > click “Restart now” > click “Troubleshoot” > “Advanced Options” > “Command Prompt” > select the user account and enter the user password)
3) Go to the file directory where the command file is saved before by entering command “C:”.
4) Make sure that the command file exists by entering command “dir”.
5) Enter the command file name “Restore_idle_disable.cmd” to run the command file.
6) Enter “EXIT” to exit the command prompt windows and boot into the Windows system after the process complete.
1) 下载并解压文件“Restore_idle_disable”到一个磁盘驱动器上。(这里我们以系统驱动器C:为例进行文件解压。)
2) 将系统引导到WinRE命令提示符。(点击Windows键 > 设置 > 更新和安全 > 恢复 > 高级启动 > 点击“立即重启” > 点击“疑难解答” > “高级选项” > “命令提示符” > 选择用户账户并输入用户密码)
3) 通过输入命令“C:”进入保存有命令文件的文件目录。
4) 通过输入命令“dir”确保命令文件存在。
5) 输入命令文件名“Restore_idle_disable.cmd”来运行该命令文件。
6) 在进程完成后输入“EXIT”以退出命令提示符窗口并引导进入Windows系统。
你也可以自行复制这段脚本:
ECHO Windows Registry Editor Version 5.00 > X:\tmp.reg
IF EXIST C:\Windows\System32\config\SYSTEM (
    COPY /Y C:\Windows\System32\Config\SYSTEM C:\Windows\System32\Config\SYSTEM.bak
    REG load HKLM\TempHive C:\Windows\System32\Config\SYSTEM
) ELSE (
    COPY /Y D:\Windows\System32\Config\SYSTEM D:\Windows\System32\Config\SYSTEM.bak
    REG load HKLM\TempHive D:\Windows\System32\Config\SYSTEM
)
REG ADD HKEY_LOCAL_MACHINE\TempHive\ControlSet001\Control\Power\User\Default\PowerSchemes\8c5e7fda-e8bf-4a96-9a85-a6e23a8c635c\54533251-82be-4824-96c1-47b60b740d00\5d76a2ca-e8c0-402f-a133-2158492d58ad /v "ACSettingIndex" /t REG_DWORD /d "00000000" /f
REG ADD HKEY_LOCAL_MACHINE\TempHive\ControlSet001\Control\Power\User\Default\PowerSchemes\8c5e7fda-e8bf-4a96-9a85-a6e23a8c635c\54533251-82be-4824-96c1-47b60b740d00\5d76a2ca-e8c0-402f-a133-2158492d58ad /v "DCSettingIndex" /t REG_DWORD /d "00000000" /f
REG ADD HKEY_LOCAL_MACHINE\TempHive\ControlSet001\Control\Power\User\Default\PowerSchemes\381b4222-f694-41f0-9685-ff5bb260df2e\54533251-82be-4824-96c1-47b60b740d00\5d76a2ca-e8c0-402f-a133-2158492d58ad /v "ACSettingIndex" /t REG_DWORD /d "00000000" /f
REG ADD HKEY_LOCAL_MACHINE\TempHive\ControlSet001\Control\Power\User\Default\PowerSchemes\381b4222-f694-41f0-9685-ff5bb260df2e\54533251-82be-4824-96c1-47b60b740d00\5d76a2ca-e8c0-402f-a133-2158492d58ad /v "DCSettingIndex" /t REG_DWORD /d "00000000" /f
REG unload HKLM\TempHive
下面就是我修复之后的任务管理器界面: